 Remove the bolster centre etch from the fret, taking care not to distort the
'legs' of the etch.
Remove the bolster centre etch from the fret, taking care not to distort the
'legs' of the etch.These instructions describe the assembly of one of the two bogie bolsters. You will probably find it convenient to build both bolsters together.
Remove the bolster centre etch from the fret, taking care not to distort the
'legs' of the etch.
 Clean up one of the faces and the side flats of one of the 2mm brass nuts to remove any machine
oil and grease. Tin those surfaces with a thin film of solder.
Clean up one of the faces and the side flats of one of the 2mm brass nuts to remove any machine
oil and grease. Tin those surfaces with a thin film of solder.
Take one of 2mm screws. Apply some grease to the lower face of the head and the top few threads of the screw.
From the outside of the etch (the side without the etched fold lines), pass the screw through the central
hole in the etch and thread on the nut, with its tinned face towards the etch.
Tighten the nut, checking that the screw is normal to the surface of the etch.
Run a generous fillet of solder around the nut, but avoid getting any into the etched fold lines or slots.
Remove the screw from the nut (it should have been prevented from being soldered in
place by the grease).
 Make the two folds in the etch
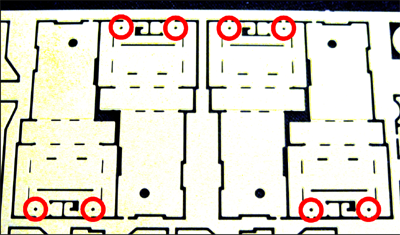 Prepare the bolster side etches by checking that a 0.5mm drill will pass through the spring seating holes
indicated. Also make sure that the slots (the three rectangular apertures, on each etch, not associated with
a half-etched fold line) are clear to take the material thickness.
Prepare the bolster side etches by checking that a 0.5mm drill will pass through the spring seating holes
indicated. Also make sure that the slots (the three rectangular apertures, on each etch, not associated with
a half-etched fold line) are clear to take the material thickness.
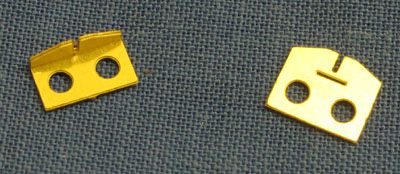
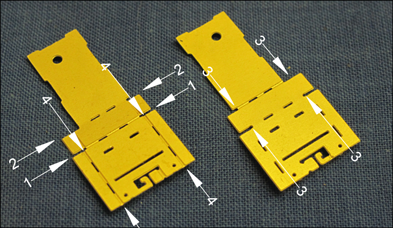 Remove the two bolster side etches from the fret. (To make sure you're paying attention, note that the
two left hand sides, and the two right hand
sides, are paired together on the fret. We weren't paying attention, so this photo shows inside and outside
faces of two of the same side).
Remove the two bolster side etches from the fret. (To make sure you're paying attention, note that the
two left hand sides, and the two right hand
sides, are paired together on the fret. We weren't paying attention, so this photo shows inside and outside
faces of two of the same side).
 Make fold 1, check it is at 90° and reinforce it with a small amount of solder applied to the slots on the
outside of the fold.
Make fold 1, check it is at 90° and reinforce it with a small amount of solder applied to the slots on the
outside of the fold.
 Make fold 2, check it is at 90° and reinforce it with a small amount of solder applied to the slots on the
outside of the fold.
Make fold 2, check it is at 90° and reinforce it with a small amount of solder applied to the slots on the
outside of the fold.
 Make folds 4 to a full 90°, then fold them out flat again.
 Make folds 3.
 Make folds 4 again. Having worked them once before should help them fold snugly up to the flanges created
by folds 3.
Make folds 4 again. Having worked them once before should help them fold snugly up to the flanges created
by folds 3.
 Repeat the above operations, folds 1-4, on the second bolster side.
 Remove two of the traction restraint etches from the fret. Ensure that the open ended slot is a loose sliding
fit over a piece of scrap etch material, working the slot, if necessary, with the scrap until the desired fit
is achieved. Fold up the restraints as shown.
Remove two of the traction restraint etches from the fret. Ensure that the open ended slot is a loose sliding
fit over a piece of scrap etch material, working the slot, if necessary, with the scrap until the desired fit
is achieved. Fold up the restraints as shown.
 Slot the restraints into the bolster sides and solder up as shown. Apply the solder to the holes in the backs
of the restraints …
Slot the restraints into the bolster sides and solder up as shown. Apply the solder to the holes in the backs
of the restraints …
 … you don't want to get any solder on the inside faces of the bolster sides.
 Fold out the secondary spring retaining hook, at the base of the bolster side, to 90°, and the block on the
other side of the aperture to 180°. Reinforce each of these folds with a tiny amount of solder.
Fold out the secondary spring retaining hook, at the base of the bolster side, to 90°, and the block on the
other side of the aperture to 180°. Reinforce each of these folds with a tiny amount of solder.
 Support the upper part of the bolster side on a block and assemble the bolster centre etch to it. There are tabs
and slots in the edges of the two components which will only fit together one way. Solder the legs of the bolster
centre to the side. Turn the assembly over and repeat for the other bolster side.
Support the upper part of the bolster side on a block and assemble the bolster centre etch to it. There are tabs
and slots in the edges of the two components which will only fit together one way. Solder the legs of the bolster
centre to the side. Turn the assembly over and repeat for the other bolster side.
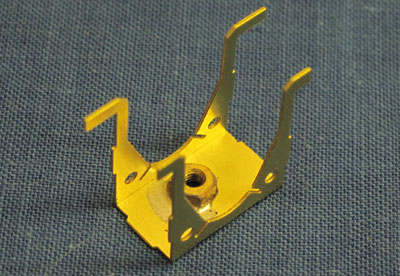
 Run some solder around the joints and folds inside the top of the bolster.
 Remove the two bolster stiffeners from the fret.
 Slot the bolster stiffeners in place in the bolster top and solder them in.
 Pair up the bolster with its subframe, as designated by the presence or absence of
the small etched triangular marks. Test-fit the bolster to the subframe; the traction restraints of the bolster
should slot over the traction ears of the subframe. Note that the bolster is asymmetric; the face of the bolster
tower which is set back a little from the lower part of the bolster sides should face the outer end of the bogie.
Pair up the bolster with its subframe, as designated by the presence or absence of
the small etched triangular marks. Test-fit the bolster to the subframe; the traction restraints of the bolster
should slot over the traction ears of the subframe. Note that the bolster is asymmetric; the face of the bolster
tower which is set back a little from the lower part of the bolster sides should face the outer end of the bogie.
 Adjust the fit between bolster and subframe such that the ears are a free sliding fit in the restraints, while
at the same time allowing minimal lateral movement of the subframe within the bolster. Work a piece of scrap etch
in the slots of the restraints if still required to get the free sliding fit or to remove any solder which may
have strayed into the slot. It may also help to check that the ears are at exactly 90° to the subframe sides,
and tweak them a little if needed. Make sure that any rough edges are removed from the ears.
Adjust the fit between bolster and subframe such that the ears are a free sliding fit in the restraints, while
at the same time allowing minimal lateral movement of the subframe within the bolster. Work a piece of scrap etch
in the slots of the restraints if still required to get the free sliding fit or to remove any solder which may
have strayed into the slot. It may also help to check that the ears are at exactly 90° to the subframe sides,
and tweak them a little if needed. Make sure that any rough edges are removed from the ears.
A tight lateral fit can be addressed in the first instance by light filing on the circular edges of the
traction ears to remove etching cusps, if not already done.
Other adjustments may be made by gentle tweaking of the bolster
assembly, trying if possible to keep the faces
of the lower bolster sides vertical.
 Once you are satisified with the fit between bolster and subframe, solder up the remaining folds and abutting
flanges around the base of the bolster.
Once you are satisified with the fit between bolster and subframe, solder up the remaining folds and abutting
flanges around the base of the bolster.
Clean any excess solder from the horizontal surfaces at the 'shoulders' of the bolster, and smooth
any rough edges on that surface.
You have now completed the assembly of the functional parts of the bolster. We have included optional etched parts to represent the visible ends of the top plank of the real loco's bolster. These are normally moulded as part of the bogie sideframes but, in reality, whilst they rotate with the steering movement of the bogie and bolster, they otherwise remain static in relation to the body of the locomotive. The following instructions describe how to fit these parts.
 Clean any stray solder from the outer surface towards the top of the lower bolster sides where the detail
etches will be fitted.
Clean any stray solder from the outer surface towards the top of the lower bolster sides where the detail
etches will be fitted.
 Remove one of the etches for the bottom face of the detail from the etch.
 Fettle the lower detail etch and slots such that the etch sits fully home in the slots in the bolster side.
Separate the two components again for the time being.
Fettle the lower detail etch and slots such that the etch sits fully home in the slots in the bolster side.
Separate the two components again for the time being.
 Remove one of the etches for the upper parts of the detail from the fret. Tidy up edges using files and a sharp
knife to remove the etching cusps.
Remove one of the etches for the upper parts of the detail from the fret. Tidy up edges using files and a sharp
knife to remove the etching cusps.
 Make the 90° fold at the back of the detail, then unfold it slightly.
 Fold in the sides of the detail, then remake the back fold.
 Apply a little flux to the joints and fold, invert the etch onto a heatproof surface and hold down the 'lid'
against the sides. Flash in a small amount of solder, through the slots in the back fold, to hold it all
together.
Apply a little flux to the joints and fold, invert the etch onto a heatproof surface and hold down the 'lid'
against the sides. Flash in a small amount of solder, through the slots in the back fold, to hold it all
together.
 Remove one of the etches for the front of the detail from the fret.
 Invert the upper part of the detail once more, position it on the heatproof surface and put the front
part of the detail in place. Apply flux to the edges of the front detail and to the
top edge of the upper part.
Invert the upper part of the detail once more, position it on the heatproof surface and put the front
part of the detail in place. Apply flux to the edges of the front detail and to the
top edge of the upper part.
 Locate the lower face of the detail in position to complete a 'box' assembly. Hold the parts firmly together
and flash in some solder through the slot and around the back. Remove the assembly from the surface and clean up
any excess solder.
Locate the lower face of the detail in position to complete a 'box' assembly. Hold the parts firmly together
and flash in some solder through the slot and around the back. Remove the assembly from the surface and clean up
any excess solder.
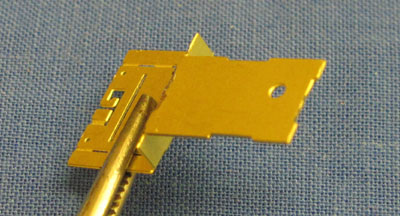
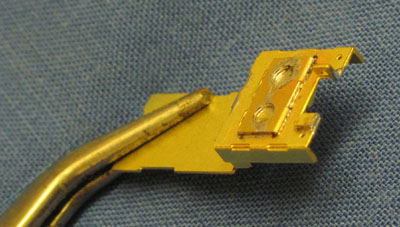
 Fit the detail in place through the slots in the bolster sides and fold up the locating tabs inside. Clamp the
detail in a hand vice or similar tool, as shown, to maintain the correct alignment and to act as a heat sink to
prevent the detail becoming unsoldered as you solder up the joint between the detail and the bolster.
Fit the detail in place through the slots in the bolster sides and fold up the locating tabs inside. Clamp the
detail in a hand vice or similar tool, as shown, to maintain the correct alignment and to act as a heat sink to
prevent the detail becoming unsoldered as you solder up the joint between the detail and the bolster.
Take care to avoid any solder getting on to the inside face of the bolster lower down, where the
traction ear will be bearing on that face.
 We suggest a break, to restore sanity, before repeating the process for the detail on the other side of
the bolster.
We suggest a break, to restore sanity, before repeating the process for the detail on the other side of
the bolster.
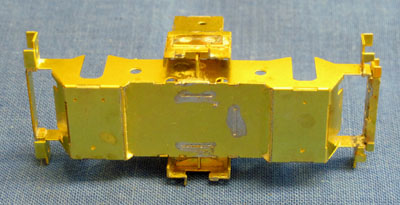
You have now completed the bolsters and subframes, the main structural parts of the kit.
Clean up the bolster assembly to remove all flux residues. If you wish to apply chemical blackening, this is a good point at which to do the bolsters and bogie subframes together.