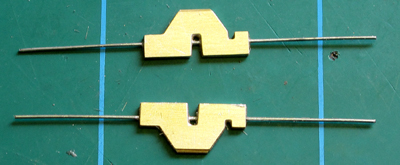
 Locate the Inner Primary Spring assemblies, which you soldered up earlier.
Locate the Inner Primary Spring assemblies, which you soldered up earlier.
Cut four further lengths of the primary spring wire, each 29mm long.
Cut two lengths of the thin (.008") steel wire, each 20mm long, and make a 90° bend in each one, 5mm from the end. These are the retaining wires for the radial trucks.
Cut eight lengths of the secondary spring wire (.020"), each 38mm long.
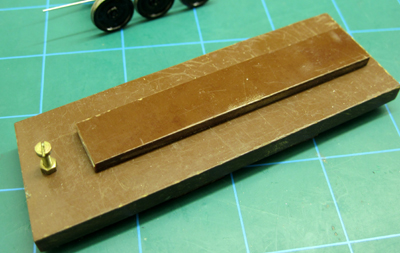 Find a block of material long enough to support the bogie subframe, deep and narrow enough to
allow the wheelsets to drop all the way down in their slots.
Find a block of material long enough to support the bogie subframe, deep and narrow enough to
allow the wheelsets to drop all the way down in their slots.
We use this tufnol jig for wheeling up and other assembly work. It allows the whole bogie to be turned round without disturbing any of the parts.
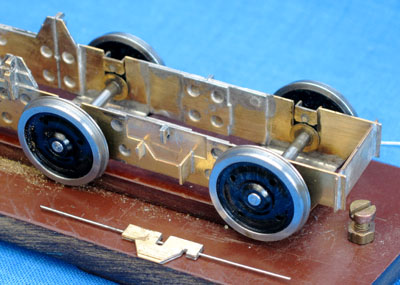 Place the subframe on to the block, and fit the central and inner wheelsets into their slots.
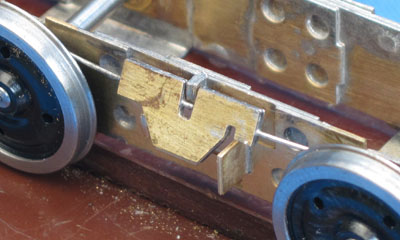
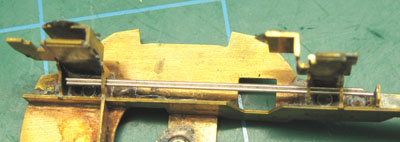
 Orientate the inner primary springs with the slots in their Splints towards the inner end of the bogie, and
fit them through the holes in the tops of the Bearing Carriers. It's easiest to do this with the Splints
upside down to start with, as shown.
Orientate the inner primary springs with the slots in their Splints towards the inner end of the bogie, and
fit them through the holes in the tops of the Bearing Carriers. It's easiest to do this with the Splints
upside down to start with, as shown.
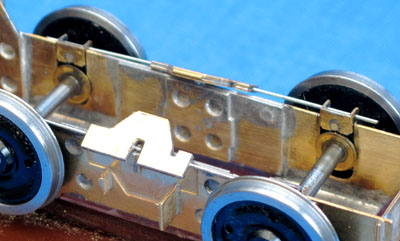
 Roll the Splints over to the correct way up, and slide them part way down the outsides of the Primary
Spring Seats.
Roll the Splints over to the correct way up, and slide them part way down the outsides of the Primary
Spring Seats.
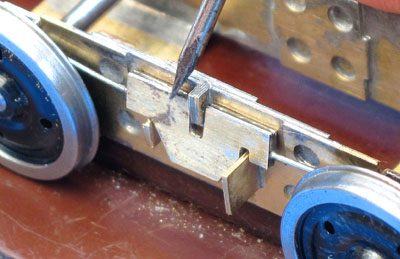 Use a screwdriver to push the Splints down over the ends of the Primary Spring Seats…
 …to the point at which they spring inwards and back up into the seats.
 Turn the bogie round and insert the outer wheelset into its slots.
 Take two of the 29mm primary springs and feed them through the hole in the outer primary spring seats and then
the holes in the top of the outer wheelset's bearing carriers, on each side.
Take two of the 29mm primary springs and feed them through the hole in the outer primary spring seats and then
the holes in the top of the outer wheelset's bearing carriers, on each side.
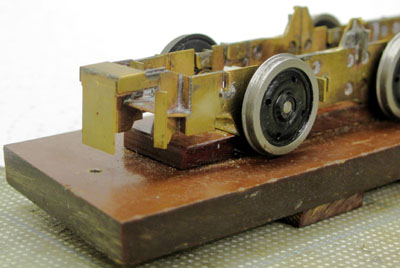
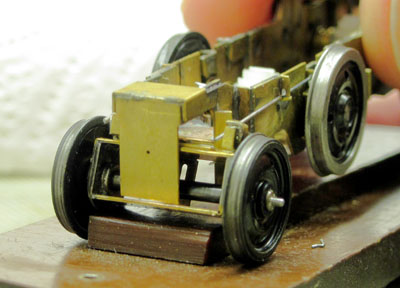
 Find the Pony Axle and Pony Bearer for the bogie.
The Pony axle is placed upside down in this photo.
 Place the Pony Axle on to the wheeling jig, with the Pony Bearer on top.
 Lower the subframe over the Pony Axle and Bearer.
 As the Pony Bearer and Axle rise into the aperture, spring the outer ends of the
primary spring wires inside the retaining edges and tabs of the Pony Bearer.
As the Pony Bearer and Axle rise into the aperture, spring the outer ends of the
primary spring wires inside the retaining edges and tabs of the Pony Bearer.
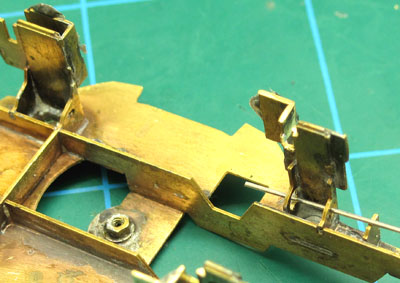
Ensure that there is enough clearance for the primary spring wires to move freely up and down with the Pony Axle and Bearer. If the tapered end of the subframe has come out a fraction wide, you can file its outer surface a little to get the clearance. If, unusually, a larger adjustment is required, it is possible to un-solder the Pony Frames and Flitching and slightly increase the taper of the outer ends of the subframe sides, refitting the Frames and Flitching to suit.
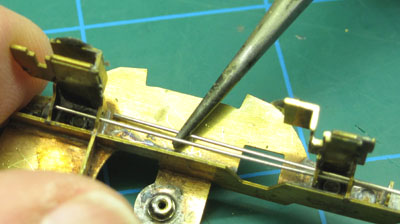
 Feed the long leg of the pony retaining wire through the hole in the centre of the Pony Flitching etch, the
slot in the Pony Axle assembly, and
the hole in the centre of the Pony Outer Frame (it can be a faff to locate the hole, but
perseverance is rewarded). Clip the shorter leg into the retaining hook.
Feed the long leg of the pony retaining wire through the hole in the centre of the Pony Flitching etch, the
slot in the Pony Axle assembly, and
the hole in the centre of the Pony Outer Frame (it can be a faff to locate the hole, but
perseverance is rewarded). Clip the shorter leg into the retaining hook.
The principal purpose of this wire is to retain the Pony Truck in the bogie. Lateral response to the
movement of the pony truck on the prototype appears not to be from a sprung, centreing action, but rather through
damping; this we get from sliding friction between the components. The wire does offer some centreing force
at large lateral displacements.
The long leg of the wire can be trimmed to minimize its protrusion beyond the Pony Outer Frame, if
necessary to give clearance behind a coupling or buffer beam detail fixings.
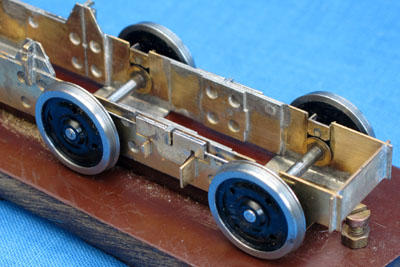
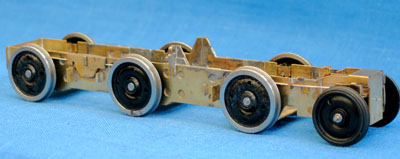 You now have a rolling bogie with fully functioning equalized primary suspension. Do a
hand-powered rolling test to check for any tight bearings, wobbly wheels etc. It is easiest to correct
such things at this stage.
You now have a rolling bogie with fully functioning equalized primary suspension. Do a
hand-powered rolling test to check for any tight bearings, wobbly wheels etc. It is easiest to correct
such things at this stage.
 Take the Bolster for the bogie and fit four secondary springs, two on each side: feed them,
one at a time, through the holes at the top of the flanges of the outer leg, from the outer end of the
bolster…
Take the Bolster for the bogie and fit four secondary springs, two on each side: feed them,
one at a time, through the holes at the top of the flanges of the outer leg, from the outer end of the
bolster…
 …picking up their inner ends with tweezers to guide them past the various edges of
the etch…
…picking up their inner ends with tweezers to guide them past the various edges of
the etch…
 …and into their seats at the inner end.
Screw the pivot screw fully home into the plastic pivot moulding, and then unscrew it, two or three times, until the screw becomes relatively easy to insert and remove.
Make sure the Bolster is the right way round, and slide it into place over the subframe. As you do so, push it to one side and you should find that the secondary springs on that side will snap in to place in their spring seat. On the other side, working through the slot in the centre of the Bolster with a small flat bladed screwdriver, push the secondary springs outwards and slide them down over their spring seat until they also snap into place.
Repeat the above operations for the other bogie so that you now have two rolling bogies.
Fit the bogies into the chassis block, using the original pivot screws to retain them. Support the bolsters from underneath while doing up the screws, to avoid loading the suspension as you push down on the screws.
You can now do static and hand-powered rolling tests, with and without the body fitted, to check overall height, body clearances, ability to handle curves, and suspension characteristics. It's helpful to clear any gremlins now, before the mechanical drives and detail are fitted. It is also extremely satisfying to feel how the locomotive moves with its sprung suspension.
Checking of buffer heights, and towed/pushed on-track testing, can be done in the next stage after the bogie sideframes have been fitted to the Bolsters.
Remove the bogies from the loco and separate the Bolsters from the Subframes, ready for the next stage.
To remove a Bolster from its Subframe, support the Bolster legs on blocks, with space between for the Subframe and wheels to drop. Push down gently on the subframe while using a screwdriver, through the slots in the sides of the Bolster, to push the secondary springs outwards, one side at a time. This technique becomes more essential after you have fitted the bogie sideframes and drive units.